Altered Spoon–Tree of Life

This is a teaspoon that has the handle cut off and bent to be used as a pendant bail.

tree of life pendant front

The first one I worked with was a larger tablespoon. I was going to drill holes in it for the wiring. However…it’s made of stainless steel, as is the teaspoon I used. Drill bits were burning up left and right. The oak wood scrap block I use to drill on has little woodburned dots all over it where the spoon rested. Even after switching to a cobalt drill bit and using 3-in-1 lubricating oil, the hole was almost through but couldn’t quite get it all the way. I was able to drill exactly 1 hole all the way thru so I went another direction.

The handle was heated with a heat gun and then bent with pliers. Then, I used a Dremel with a cutting wheel to remove the spoon handle, leaving enough to bend inward to create a loop. It had to be heated several times to get the bend all the way to the spoon back–stainless steel…

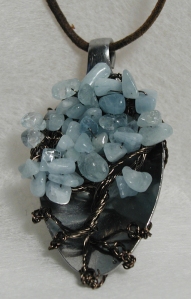
I used twisted gun metal bronze (basically a pretty brown) wire as the back grid. I wanted twice as many loops for the top of the tree as for the roots, so I bent the wire and created the “root” loop. Then made a loop in the other ends to fold over the top of the spoon. To create a more decorative and organized spoon back, I alternated one pair of wires with the other for a crisscross pattern. One wire that wasn’t doubled, so I could have an odd number of loops.

tree of life back

The tree itself is 28 ga. wire (same color), 3 strands for each of the bottom holes. Once the tree trunk and main branches were defined by twisting, I added aquamarine chip beads, looping the twisted wire through the top loops. Those twigs were twisted together and tucked behind the gemstone leaves.

The finished pendant is strung onto a leather cord. At some point, I will try drilling the holes again, but this time the Dremel goes into its drill press where I can use steady consistent pressure.

ArtCharms–Things that Go Bump

The other ArtCharms Halloween swap was a max 1-1/2″ charm with a moo card. A moo card is 1″x3″ and created like an artist trading card.

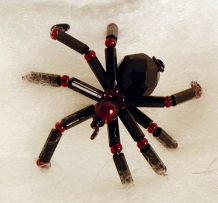
I went with beaded spiders. There are lots of tutorials on the internet. This is the one I used: http://www.shawkl.com/2011/09/beaded-spider-tutorial.html by Kathy Shaw. I altered the size by adjusting 1) the size of the body and head and 2) the number of bugle beads on the legs.

This spider has about an 8mm bead for the body and 2mm for the head (maybe an E bead?). Two black bugle beads and 3 red seed beads make-up each leg on 24 ga. wire. Another piece of 24 ga. wire was used for the body. I put a spiral on one end, added the body bead, strung the legs, then added the head bead. A wrapped loop is where a jumpring is added. Position the legs and I think I just made the 1-1/2″ max size.

Mom wanted me to show her how I did this, so from her stash, we took a hemalyke bead and a green bead (about a #6 seed bead) for the body and some iridescent bugle beads and green seed beads for the legs. I don’t have a picture, but the cool thing about this one is that it sticks to the fridge. Hemalyke is magnetic.

When I took the photo of my spiders, I thought it would be fun to make it look like they were crawling on webbing. Not so much. It got caught in all of the little spirals at the end of the legs. Took awhile to get it all off. Also, some of the legs were a little loose, so I thought it would be a grand idea to superglue the legs near the body. Again, not so much. The superglue fume created a white residue on the glass beads. It actually looked good, but I didn’t want it rubbing off on anyone’s clothing. Instead, I rubbed it off with a toothbrush. It did come off, but what a pain in the neck. Luckily, there were only a dozen of them.

spiders on their webspider close up

Here is the moo card; yes, I cut all of those little spiders out by hand. Besides my Dremel, my other go-to tool are my Fiskars Softouch Micro-Tip Scissors. They get into all the little nooks and crannies.

things that go bump moo card

ArtCharms–Creepy Crawly Bottle Pendant

The ArtCharms group had a couple of Halloween swaps. I signed up for both. The Creepy Crawly bottle pendant specs are 1-3/4″ to 2-1/2″ glass bottles altered for the theme. Since I was traveling at the time, I ordered 7 from Specialty Bottles (http://www.specialtybottle.com/1dramclearglassvialwblkcap.aspx). Since then, I’ve found some in the bead section at Hobby Lobby…note for future reference.

My original plan was to glue “webbing” from one side of the bottle to the other, but I have some of those plastic skeletons you can find at the dollar store. Instead, I used some Judikins Diamond Glaze and  “glued” some “dirt” (Barbara Trombley’s Elements Earth Textures; http://www.artglitter.com/retail/elements/rtextures.html) in the bottom of the glass bottle, then glued the hands (up to the elbow) I cut off the skeletons. Since I wanted a little “distressing”, if you will, inside the bottle, I added a thin coat of glue and some alcohol ink to the sides of the bottle. Once all of that was dry, I strung silk roving from the bottom of the bottle to the top. This was not easy to do.

I used tweezers that fit nicely in the bottle…that is as long as you had them pinched. The first bottle broke when the tweezers slipped and sprung open. Anyway, once that part was done, I added spiders. These little dudes are made with a black seed bead and 4 strands of 28 ga. black wire about 3/4″ long to start. Once the strands were threaded through the bead, I used some superglue to hold them in place. After that was dry, I trimmed up the legs, bent them into shape and added a 3 to each bottle.

To cap it, I wirewrapped some copper wire like a spiderweb for the top, creating a loop, then dropped the excess down the sides of the bottle, spiraling the ends. This cap was attached with some copper tape. Unfortunately, I wanted a patina on the wire and the tape, so I had to sand both as best I could before any wrapping. Some of it patina’d, some of it didn’t. The liver of sulfur is wet and unstickied the copper tape, so I had to superglue it to the bottle. It all turned out, though.  Not sure anyone will want this around their neck, but I could be wrong. 🙂

Creepy Crawly Glass Bottle Pendant

Altered Cuff–Steampunk

This altered cuff is for a swap on Art for the Creative Minds (Yahoo! group).  My first thought was to cut a piece of leather and embellish it with the laces and trims. Since it was just going to be covered up, that changed to cutting an actual cuff from a men’s shirt.

The first step was to ink the cuff to “age” it a little. The pointed lace and pearls were colored, too. Both with fabric dye and alcohol inks. The gold tulle was hand-pleated and is the first layer.

Altered Cuff 1

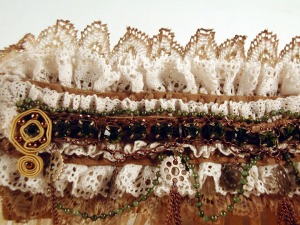
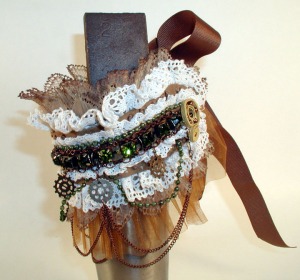
Next layer is the pointed lace. It wasn’t “frilly” enough, so I gathered two sizes of crocheted lace (I didn’t crochet the lace). The larger lace is sewn on top of the pointed lace. I did want some leather on this project, so I cut three strips: the middle strip has a strip of rhinestones sewn to it, the other two have French knots embroidered down their lengths. The strips are attached to the cuff with E6000. The smaller crochet lace circles the middle leather piece.

altered cuff 3

Chains strips have been attached to the rhinestone strip with large oval jump rings. To cover up the lace trip joins, I made the circular trims on each side with elastic and beads. More chain was looped and attached to the strips along the rhinestones. They were first attached directly to the chain, but it didn’t seem “finished”, so I added small gears along the hand-side of the cuff. It still wasn’t quite there, that’s when I dyed some pearls with meadow and oregano alcohol inks and attached them just under the smaller crocheted lace.

The last step was to determine how the cuff would fasten to the wrist. I toyed with the idea of elastic, but thought that a bow would add a little more “frill”. A length of grosgrain ribbon is sewn the entire length of the cuff on the inside. If the recipient wants it a little tighter, all she will need to do is undo enough of the sewn portion on each end and make the adjustment there.

altered cuff 2


Seashore Treasure Charm

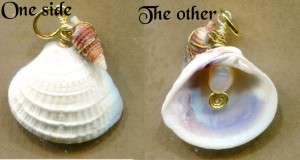
The ArtCharms group had a Seashore Treasure swap. We just happened to be on Sanibel Island when this swap was open, so I learned the Sanibel stoop. This wasn’t my original idea, it’s just the one that survived implementation.

Seashore Treasure ArtCharm

My first idea was to bead the shell, so I drilled tiny holes along the edges with my Dremel. It took about 8-10 drill bits to get thru 12 shells–should have tried one first to see what it looked like, but I’d forgotten about the swap, so I was in a hurry.

I started off with 2 rows of holes along the curved edge and used 28 gauge gold wire with gold beads (Mill Hill beads, I believe). It looked nice, unfortunately when I attempted to put the head pin thru the top hole with the freshwater pearl, the twisting put too much pressure on the top and it broke. This happened on 2-3 times, so I switched to the above design.

Color Pallette Swap

One of the ArtCharms group swap hosts decided to do color palette swaps this year instead of just specific colors. Those that sign up for the swap can use a minimum of 2 colors on the palette along the side of this palette…pretty photograph:  http://design-seeds.com/index.php/home/entry/chilled-tones2

Polymer clay chilled palette charm

Polymer clay chilled palette charm

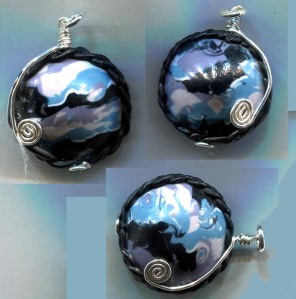
First I made a lentil bead from scrap clay using a 5/8″ bicone bead roller (http://www.polymerclayexpress.com/products/tools/jewelry-tools/bead-making-tools/polytools-bicone-bead-shaper) and baked the beads on a bead rack. Then I mixed the colors I wanted to use, which was all 5 of them. Luckily, I had some scrap clay that was already mixed close to the palette, I just added whatever it needed, if anything. The design is a mokume gane cane. It’s been awhile since I worked with polyclay and mokume gane, so I had to revisit the procedure. Once the  cane was done, I sliced off thin pieces and added them to the lentil beads. I used the darkest value and pushed it through a Makins polymer clay extruder using smallest strand disk, braided strands together and wrapped it around the lentil bead. The beads are coated with Kato’s clear liquid polyclay. Once they were baked, they were polished with a demel and muslin wheel and wrapped with silver wire. Made about 20 of these…they’d be a nice mix with the Winter Night Sky charms.

ArtCharms RR–Vintage Birds

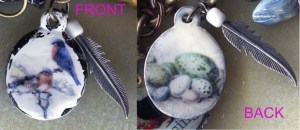
October was another bird theme. This one is done on Tim Holtz’ enameled tags. The images are printed on coffee filters and adhered and coated using Judikins’ Diamond Glaze. I had to enamel the back of the tag to get it white. I added a bead to a silver metal feather and attached it to the charm.

Vintage bird charm front and back web

Tim Holtz has some enamel paint out as well. Might have to look into it at some point.